- › General / Specs / User’s Guide / Pre-Sales
-
- What Mac models and macOS versions are compatible with MegaSeg?
-
MegaSeg runs on any Mac with macOS 10.13 or higher and optimized for M-series Apple Silicon chips, as well as older Intel-based Macs. Make sure you have the latest version of MegaSeg by using the ‘Check For Updates’ command in MegaSeg’s Help menu.
All base model Macs work with MegaSeg, such as the MacBook Neo, MacBook Air and Mac Mini. The oldest Macs currently supported requires macOS 10.13 High Sierra or newer. (To get the correct build for 10.13, download MegaSeg directly from that Mac.)
- It’s wise to backup your Mac with Time Machine before upgrading to a major macOS version. If you use 3rd-party peripherals, such as a DJ controller or audio interface, check with the manufacturer if a driver or firmware update is required for compatibility.
- If you upgraded to macOS 10.15 or newer before updating to MegaSeg 6.1 or newer, or jumped from macOS 10.12 or older, please use our License Recovery system to install the latest MegaSeg update.
- Will MegaSeg run on the new Apple Silicon Macs?
-

Yes! MegaSeg is fully optimized for Macs with Apple Silicon M-series chips (e.g. M1, M5), and it also runs on older Macs with Intel processors. Check for updates to make sure you have the latest MegaSeg update installed!
- Now that Apple retired iTunes, how does this affect MegaSeg?
-
Not at all. While a lot has changed in macOS over the last few years, the retirement of iTunes is greatly exaggerated! The iTunes app has simply received a much needed makeover, and a new name. Apple split iTunes into three separate apps called ‘Music’, ‘Podcasts’ and ‘TV’, to help streamline things.
The new Music app in 10.15 and higher that replaces the music portion of iTunes will be very familiar to you, and works about the same as iTunes—Just with less clutter from Podcasts, TV and Movies. All your existing iTunes music and playlists will be intact. You can even still purchase music from the iTunes Store within the Music app. (Note if you also subscribe to Apple Music, you will need to enable the ‘Show iTunes Store’ option in the Music app preferences.) Heck, even the ability to rip CDs is still supported! (CDs are those round shiny plastic things hipsters use as coasters.)
TL/DR: The latest MegaSeg supports the new Music.app in macOS 10.15 and higher.
- Is there a manual, user’s guide, or tutorial for MegaSeg?
-
You bet! There’s a comprehensive User’s Guide available in MegaSeg’s Help menu. Simply download MegaSeg to view the guide. (You’ll also discover hidden gems within MegaSeg’s version history.)
- If I lose the program, can I reinstall without paying again?
-
Absolutely. After purchase you’ll receive an email receipt with your download link and license key for safekeeping. Even if you lose that, our License Recovery system will get back up and running fast. Or simply contact us and we’ll be glad to help.
- I lost my MegaSeg license key. How can I retrieve it?
-
No problem! Use our License Recovery system to retrieve your key, or contact us with your information and we’ll look it up for you.
- How much are upgrades?
-
Minor updates are free (version 6.0 to 6.1 for example). Major version upgrades (x.0 or x.5) are a fraction of the full price. See our current upgrade pricing.
- Where can I buy MegaSeg software?
-
We only sell our ‘MegaSeg Pro’ edition directly on our site right here. There are no authorized third-party online resellers. If you see the MegaSeg Pro edition for sale elsewhere, it’s a scam and may contain viruses or malware.
We do offer the ‘MegaSeg DJ’ edition for sale on Apple’s Mac App Store, but direct purchases through us are preferred.
- Can I upgrade the DJ edition to MegaSeg Pro?
-
Yes you can upgrade to MegaSeg Pro from both our direct and Mac App Store versions of MegaSeg DJ. Click the ‘Upgrades’ tab at the top of our buy page and select the ‘Upgrade DJ to Pro’ option.
- How reliable is MegaSeg?
-
We’ve had wonderful success with the stability of MegaSeg and macOS. DJ’s and radio stations use MegaSeg worldwide without fail. It’s always a good idea to have a safety net just in case, and keep a backup drive with your music handy. (You can even install macOS and MegaSeg on your backup and boot from it directly.)
- Do you make a PC version of MegaSeg?
-
Sorry, not at this time. MegaSeg’s stability and reliability builds off of macOS (and its solid UNIX foundation). Since Apple makes both the hardware and OS, everything runs smoothly (a difficult task on Windows due to the magnitude of hardware combinations!) This allows us to make better software for you, with fewer tech support distractions.
Macs are also replaced less often, staying in operation years longer than most PCs. Fewer tech issues and longer use — That’s money saved.
Also consider today’s Macs can boot Windows if needed. So when you get a Mac, you’ll have the best of both worlds. (With Parallels or Fusion, you can even run both at the same time!)
Check out the Mac Mini which runs MegaSeg perfectly. You can even connect it to your existing PC monitor and keyboard, or run it as a “headless” system via remote desktop screen sharing. And for an online radio station, you could even run MegaSeg in the cloud via various Mac Mini server farms, such as MacStadium, MacMiniVault, MacInCloud, and Flow.
- I love MegaSeg, do you have a badge for my site?
-
We love you too! Yes you can copy one of the codes below to embed a badge on your site...


While you’re at it, join us at these social gatherings:


- › Broadcasting / Radio Automation / Podcasting
-
- Can I use MegaSeg to stream live or set up an online radio station?
-
Yes, MegaSeg handles playback automation and scheduling for your online station, and you can stream its audio to any SHOUTcast or Icecast server and various other platforms using stream encoding tools, such as:
- LadioCast (Free. MP3/AAC+/OGG codecs)
- Broadcast Using This Tool (Free. MP3/AAC/HE-AAC/OGG codecs)
- Audio Hijack (Paid. MP3/AAC via its ‘Broadcast’ block, or RTSP via its ‘Live Stream’ block)
Note Audio Hijack has the ability to capture audio from MegaSeg directly, while other encoders require an audio routing tool, such as BlackHole (free), or Loopback (paid), to direct MegaSeg’s audio into the encoder. With BlackHole, open MegaSeg’s Settings > Devices tab and change the Playlist Output to ‘BlackHole’, and do the same for the encoder’s audio input.
Alternatively, if you have a physical mixer, you can route MegaSeg’s audio to the mixer and take its master output back into the Mac to be captured by the encoder. (Take care to prevent a feedback loop by either using a second USB audio device, or muting the encoder’s monitor output if possible.)
Configure Metadata for your chosen encoder:
- Audio Hijack: Click the Broadcast block’s Metadata tab, then under the ‘Track Titles’ section, select MegaSeg as the source.
- Ladiocast: MegaSeg will push metadata to it automatically.
- Broadcast Using This Tool: Click its Settings button, then the Stream tab. Under the ‘update song name’ section, check ‘Activate’, and then click the folder button to the right and select MegaSeg’s NowPlaying.txt file within MegaSeg’s data folder, located by default at ~/Music/MegaSeg/Logs/NowPlaying.txt
- How can I use MegaSeg for podcasting or produce a radio show?
-
For specific audio routing and recording tools, see the answer under Audio Output / Recording. But here’s some workflow ideas on how you can use MegaSeg to produce a podcast or prerecorded radio show.
Generally MegaSeg is designed to work either on the station’s studio side of the equation (i.e. as on-air studio automation or live-assist playback system), or as an audio creation tool on a show’s production side. You can use MegaSeg to generate a small playlist and scheduling files that reference larger media for live mixing, or record the final mix into a single audio file such as for an hour long podcast or show.
There are many possible ways to go about producing a prerecorded show, and several hybrid variations. For example, there’s the live or real-time approach (i.e. the “one take to tape”), which gives the show a lively off-the-cuff talk show feel. On the opposite side of the spectrum is a segment produced, compiled, and edited approach. A hybrid example is attempting to record live, but stopping and starting at each flub or mistake, and going back and editing to clean things up, or connect the various live takes.
MegaSeg is a very useful tool in all these cases, as it gives you the ability to have all your media cued up and ready to go for a live record, including on-the-fly insert of sound effects, station IDs, or starting segments like music breaks, sponsor breaks, pre-recorded interviews, etc. These things can be played off-the-cuff, or pre-scheduled and lined up in the playlist queue, including special “Break Tracks” that pause for live talk segments. Alternatively MegaSeg can be used to assemble various show segments together seamlessly for a final audio file mix or live-to-air mix.
You can even route MegaSeg’s playback and your Mic audio into separate tracks into any audio editing tool of your choice (e.g. GarageBand, Logic Pro, Audacity, etc.) which gives you even further control over the final editing process. Or you can go the opposite direction, and record your voice intros and outros via those editing tools, and import them as separate files in MegaSeg to insert between music tracks or other media segments (i.e. voice tracking), and even set up a show format or schedule to generate a final mix automatically each week.
As mentioned at the start, please check out our recording article for a list of useful audio routing and recording tools that work great with MegaSeg and your existing production workflow.
- How do I stream video or webcast with MegaSeg?
-
You can use MegaSeg with any stream video encoder you wish by interfacing it with MegaSeg’s video and audio outputs. This can be done using either a dedicated video capture and stream encoder device, or install a stream encoder on the same Mac running MegaSeg.
A great free capture, encoding, and streaming tool for Mac is OBS Studio which supports streaming video to YouTube, Facebook, Twitch, and more. It includes options to capture MegaSeg’s video window, live cameras, etc. Other options include Ecamm Live and Wirecast.
Finally, you can always connect your Mac’s video output jack (which MegaSeg can output full screen video to) to the video capture input of any video stream capture/encoding hardware.
Here’s an example of how to set up a video capture of MegaSeg's Video window:
First decide what quality you want the video stream to be. In this example, we’ll use 720p, so in MegaSeg’s Video menu, choose ‘Fixed Size 720p’ and start playing a video. Then move the video window to a corner of the screen that you won’t obstruct with other windows.
Next, in your video capture app of choice, you can select the window you wish to capture. For example, in OBS you would choose the ‘macOS Screen Capture’ option, which allows you to select a specific window. In this mode OBS also allows you to not capture the mouse cursor to prevent that from showing if you accidentally move the mouse over that window. (Some other capture apps may only allow you to select a region or box within the screen.)
For audio, OBS and others typically allow you to select the app to capture audio directly, or you can use a virtual audio routing tool like BlackHole (free), or Loopback to route MegaSeg’s audio into the video capture app or encoder. For example, if you use BlackHole, open MegaSeg’s Settings > Devices tab and change Playlist Output to ‘BlackHole’, then open the video capture/encoder and calso select ‘BlackHole’ as the audio input device. An audio conncetion is then made betwen the two apps via the virtual audio interface.
- Can I specify the time a file (e.g. jingle, ad, promo, or ID) will play?
-
Absolutely. MegaSeg incorporates powerful Scheduler and Events features. You can create schedules (playlist “Hot Clocks” based on categories/genre) and then use the Events feature to start them at specific times, or insert promos/IDs/jingles/sweepers at certain intervals (every 3 segues, every 15 minutes, 59 past the hour, Tuesdays at 10:30 PM, etc). Please read the built-in User’s Guide in MegaSeg’s Help menu for more detailed information.
- Can MegaSeg schedule commercial breaks for radio?
-
Yes MegaSeg includes a built-in Scheduler and Events system to automate playlists for music rotations, ad “stopsets”, promos, station IDs, etc. The category scheduling system is based on pre-shuffled “rotations” of tracks, so it allows for even rotations. That said, you can control when tracks in each category stack are reshuffled. The default is ‘Every 1 Rotation’, meaning all tracks play once before reshuffling. This is set in Settings > Scheduler > Category Settings.
Note that when Rules (Artist, Track & Album Separation, etc.) are enabled and set to Automatic you need to select the categories MegaSeg should ignore to prevent issues with scheduling non-music tracks (Ads, IDs, Promos, Voice-tracks, etc.) This is set in the Rules tab on the bottom right ‘Ignore Categories’ box.
MegaSeg’s Events tab also includes the ability to Insert Playlists or Playlist “Schedules” into other Playlists or Schedules. This is how you can insert a commercial break, or tracks from a group of categories, to be scheduled into a more general music-based schedule or playlist.
For example, using the Scheduler, you could build a short 2-minute ad “stopset” using categories in a specific order like so:
Bumpers <--e.g. “We’ll be right back after these messages”
Ads60
Ads30
Ads30
Station Promos
Jingle
...All these categories contain various production elements in them. This Schedule can then be saved as a file named “Stopset A” for example. Then in the Events list you would simply insert this into the main music playlist or schedule via a single event that triggers every hour at a certain time:
:23 past the hour Insert Playlist: Stopset A
(Of course there are many more trigger types available.)
Once this Event triggers, tracks from Stopset A’s categories will be inserted into the active playlist queue. Once the last inserted track ends, it continues with the original playlist.
Above is just a simple example. You can of course use many more categories to control the rotation speed of your ads. For instance, with two categories such as “Ads60-Fast” and “Ads60-Slow”, depending on how many ads you put in each category, and how often you schedule said categories, you can control how often each ad plays.
Also note you can generate a report of every time a particular ad played using the File > Show History menu command. Then even print this report with File > Print (Command-P) and save as a PDF.
- How do I send the current song info to TuneIn.com or other external services?
-
To send metadata to TuneIn, open MegaSeg’s Preferences window and select the Logs tab, then click to enable the ‘Send To Server’ checkbox and then select the ‘TuneIn’ option in version 6 and higher.
You should now see the following URL template appear in the ‘Server URL’ field:
air.radiotime.com/Playing.ashx?partnerId=ID&partnerKey=KEY&id=SID&title=%Title%&artist=%Artist%&album=%Album%Next, replace ID with your TuneIn Partner ID, KEY with your Partner Key, and SID with your Station ID. Note you’ll need to contact TuneIn if you don’t have this information.
And that’s pretty much it! However for commercial stations, you might include one extra bit at the end:
&commercial=%RecordID%...Then tag your commercials in MegaSeg’s Edit window > Additional tab > Record ID field with the text “true”. (Note, you can perform a multi-select edit to assign this tag to all commercials at once.)
To send metadata to other services that accept HTTP Get or Post updates, you can apply the same concepts above, or use some built-in example presets in the popup menus for Shoutcast and Icecast servers, or even upload directly to your website via FTP.
- How do I set MegaSeg to automatically open and start playing after a power failure or powered up?
-
Here’s the list of steps and settings to have your Mac reboot, login, start MegaSeg and your encoder after a power outage:
- If your drive is encrypted using FileVault, you’ll need to turn that off, as it prevents the Mac from booting (as it will be stuck at a login screen to mount the boot drive.)
To find this setting on macOS 13 or newer: Click the Apple Menu > System Settings > Privacy & Security > scroll all the way down and select ‘FileVault’ and turn it off.
To find this setting on macOS 12 or older: Click the Apple menu > System Preferences > Security & Privacy > FileVault tab, and turn it off.
Once FileVault is off, depending on your Mac model, it may take some time to complete in the background, but you can continue setting things up…
- Enable the Mac to reboot after a power failure:
On macOS 13 or newer, Apple removed the option to easily enable this in System Settings (why Apple?! 🤷♂️), but you can still enable it with the Terminal app (whew! 😅). Open your Applications folder, then the Utilities sub-folder, and double-click Terminal. At the command prompt type:
sudo systemsetup -setrestartpowerfailure on...and press Return. It will then prompt for your Mac’s login password, but won't show your typing. If you ever want to disable this in the future, simply type the same command but replace “on” with “off” at the end.On macOS 12 or older, click the Apple menu > System Preferences > Energy Saver > and check ‘Start up automatically after a power failure’. (oh wow, so easy! 😌)
- Set the Mac to automatically login at startup:
On macOS 13 and newer click the Apple Menu > System Settings > Users & Groups > find “Automatically log in as” and select your account name.
On macOS 12 and older click the Apple Menu > System Preferences > Users & Groups > click “Login Options” on the bottom left, then click the Lock to allow changes. Once unlocked, click the “Automatic Login” popup menu and select your account name.
Note, if the “Automatic Log In” option is not available (grayed out) this means you have encrypted your startup drive using FileVault. You must turn off FileVault first (see step 1). You may have to come back to this step until it has completed the decrypt (the current progress is shown in the FileVault settings). - Set MegaSeg to start at login:
On macOS 13 and newer click the Apple Menu > System Settings > General > Login Items > In the “Open at Login” list, click the plus (+) button at the bottom left corner of the list, and select MegaSeg from your Applications folder. If you use a stream encoding app, add that as well.
On macOS 12 and older click the Apple Menu > System Preferences > Users & Groups > select the active account in the list, then ‘Login Items’ tab. Add MegaSeg to the list. If you use a stream encoding app, add that as well. (Note the checkboxes next to each app only means to hide the app so the app window is not visible until clicked in the dock.)
You can now close System Settings / System Preferences. Set MegaSeg to resume playback or start a playlist on launch:
Open MegaSeg and click Settings > Events tab, and make sure the ‘Playlist Events On’ checkbox is checked. Then click the ‘New Event’ button to add select the ‘Insert Track’ option and choose a short “station ID” or announcement track to drag into the box. Click the ‘Continue’ button and on the next screen select ‘At Startup’ as the event’s trigger. This track will then play when MegaSeg launches, and resume the current playlist queue that was already there before the power outage.
Alternatively, if you want to replace what is in the playlist queue, you can use ‘Open Playlist or Schedule’ as your ‘At Startup’ event to ensure a fresh playlist is loaded.
Set your encoder to start streaming on launch:
If you use a stream encoder app with MegaSeg, there may be additional settings/steps required to ensure the stream starts up. For example, BUTT has a “Start streaming after launch” checkbox in the Settings > Stream tab. Audio Hijack has an ‘Auto Run’ checkbox in the Sessions list (...if you don't see it, make sure you have version 4 or newer and click the ‘show columns’ button on the upper right.) The Ladiocast encoder requires a custom script we’ve made to start it broadcasting, which would need to be added to the ‘Login Items’ (see step 4).
- If your drive is encrypted using FileVault, you’ll need to turn that off, as it prevents the Mac from booting (as it will be stuck at a login screen to mount the boot drive.)
- We would like our Music.app or iTunes library on a separate server. Does the server need MegaSeg installed?
-
No it’s not required to have MegaSeg installed on the server. All MegaSeg workstations can access the media files via File Sharing.
However, we do recommend the “server” be the same Mac running MegaSeg in the primary on-air studio. (In other words, the on-air workstation is also the server.) This allows the most critical MegaSeg system to have direct access to media files without needing to be served over a potentially slow or troublesome network. All other systems (production room, program director, etc.) can then access MegaSeg’s library and media files remotely via the “on-air server”.
While there’s no need to use Music.app or iTunes with MegaSeg at all, if you wish to use iTunes or Music.app for the core media library, you still can with the above approach (i.e. both MegaSeg and Music.app/iTunes running on the on-air system). The MegaSeg User’s Guide (available in the Help menu when running) has additional information on the network syncing features.
- Can MegaSeg interface with a satellite receiver to automate radio programming?
-
Yes, there are two primary methods to use a satellite receiver with MegaSeg and respond to contact closures for commercials:
- Audio play-thru control (i.e. mic play-thru events)
- Contact closures and relays (i.e. detect or send Serial Trigger events)
Audio Play-Thru Control
The play-thru control option is the simplest if all you need to do is cut the satellite audio, play commercials, and return. This works by routing the receiver’s audio into the Mac’s audio input (or a 3rd party USB/Thunderbolt audio device) and set MegaSeg’s ‘Mic Input’ to that device. Then in MegaSeg’s Events tab, set up a trigger to turn the ‘Mic play-thru’ off in combo with an event to start the commercials.
For example, here’s an Event List to play a commercial break at :20 past every hour, then return to satellite:
:20 past the hour Mic Play-Thru: Off and Stop Playlist :20 past the hour Open Playlist: Stopset A When playlist ends Mic Play-Thru: On and Stop Playlist The “Stopset A” playlist can actually be a Playlist Schedule which includes category rotations of spots, or just a single track. For example, in the Scheduler tab, you can set up “Stopset A” to have this structure:
Bumper IDs Spots-60 Spots-30 Bumper Promos break The “Bumper IDs” and “Bumper Promos” categories can contain a variety of IDs and Promos that rotate each time the stopset plays.
Note the “Break” track at the end is important to allow the last item to play entirely before the ‘When playlist ends’ event triggers to turn the audio play-thru back on.
Contact Closures & Relays
MegaSeg can interface with various I/O devices using a special event called ‘Insert Break (serial trigger)’ which can be configured to send and/or wait for any serial command string. Using a USB-to-RS232 serial cable, MegaSeg can communicate with any RS-232 compatible device.
If your satellite receiver has a built-in RS-232 port, it may be possible to directly control it instead of using a relay box by configuring the text strings MegaSeg sends or receives. Otherwise, we have configured the default settings to work with the SRC-4 from Broadcast Tools, a four relay and contact closer box. (Scroll to the middle of the list.)
Here’s an Events List example:
When playlist ends Insert Break Serial Interrupt enabled When playlist ends Open Playlist: Stopset A In the Insert Break Serial event dialog, there are options to set the serial port baud, bits, etc, as well as a ‘Send on Break’ text string (the data it sends to the RS-232 device to trigger a relay). Note the default options are set to work with the SRC-4, besides the first Port option which must be set to the USB-to-Serial device you are using. Below the line are the various serial commands it sends or listens for. The first "Segue on Receive" is what is it listens for to continue past the break (in the box is the data it receives from the SRC-4 on closure, and then advances past the “break track”). Note we have it set by default to pulse the relay, and wait for a closure to continue. Also note in this example, you need to include insert this ‘Break Track (Serial Trigger)’ event at the end of the “Stopset A” schedule or playlist.
MegaSeg is also compatible with USB-HID input control boards. These can be wired up to trigger a segue within the Serial Break Trigger events, or when used in combination with USB Overdrive can be configured to trigger any of MegaSeg’s menu commands or keyboard shortcuts.
- Is MegaSeg compliant with music licensing laws?
-
As far as music licensing goes, MegaSeg is simply a playback tool, similar to a CD player and mixer. Using Music.app/iTunes for example, you can transfer your CDs to your Mac and then import and play them in MegaSeg. Transferring CDs you’ve purchased to your drive is like making a backup copy of a software program. If you get rid of or sell your original purchased CD, you are required to delete the backup copy.
However, when it comes to music public performance rights, each individual venue or station you perform at should be ASCAP and BMI licensed (in the USA), which would cover the music you play from their respective catalogs. Some streaming providers also handle licensing via an “umbrella” plan, meaning all broadcasters that use their service are automatically licensed, as long as you follow their rules and terms of service. Otherwise if streaming on a service that does not cover licensing on your behalf, you can signup with the relevant Performance Rights Organizations (PROs) in your region directly to cover licensing, such as SoundExchange, ASCAP, and BMI in the USA.
- Disclaimer: This is not legal advice. We are not your lawyer. Do not taunt Happy Fun Ball.
- › Controllers / Remotes / Interfaces
-
- What DJ controllers work with MegaSeg?
-
MegaSeg includes presets for many popular DJ controllers, and any MIDI-based controller can interface with MegaSeg using your own custom preset in the MIDI Settings. Simply choose ‘New Preset’, select a relevant function in the control list, toggle ‘MIDI Learn Mode’ on, and press the button or knob on the controller to connect it, then toggle off the Learn Mode to try it out. If you make a preset for a new controller, or need any help doing so, please let us know.
Here’s a list of built-in MIDI controller presets in the current MegaSeg version. Click a manufacturer name to expand the models:
Don't see your controller? Let us know and we can help you map it using ‘MIDI Learn Mode’ in MegaSeg’s settings > Devices > MIDI Settings.
- Are there wireless remotes I can use to control MegaSeg?
-
Yes, there are various options listed on our Controllers page. MegaSeg is compatible with any remote that sends “media key” commands, as well as shortcuts for Apple’s Keynote app (enable this mode by selecting the ‘Use Keynote Shortcuts’ command in the Playback menu.)
Also checkout the full remote screen control options.
-
Yes! There are several options available for remote access of MegaSeg and your Mac. Some popular options include:
- In macOS 10.15 and higher, there’s a “Sidecar” feature that allows you to use your iPad as a wireless screen for your Mac and MegaSeg, but requires using the Apple Pencil, a paired mouse, or a trackpad keyboard case to interact with Mac apps. See Luna Display and Duet Display below to use the iPad as a touch-screen.
- Using the Mac’s built-in Screen Sharing feature (available in all versions of macOS via System Settings > Sharing > Screen Sharing) — This requires setting up your router’s port forwarding to access outside of your LAN). This option is also compatible with various free VNC clients on all platforms (Mac, PC, etc.)
- Using Apple’s Remote Management feature (available in all versions of macOS via System Settings > Sharing > Remote Management checkbox) which works with Apple’s “Remote Desktop” app. However this is generally overkill for basic access (it’s designed to administer a classroom of Macs, a computer lab, or large company.)
- Various 3rd party screen share services that work without router configuration, including AnyDesk, TeamViewer, LogMeIn, and GoToMyPC. Most of these offer free options for light or individual use.
- Luna Display and Duet Display can both turn your iPad (or Android tablet) into a wired or wireless (WiFi) touch-screen monitor for any Mac running MegaSeg. Note macOS 10.15 and higher introduced a similar feature called “Sidecar” (covered above), but Luna Display and Duet Display are compatible with older iPads and macOS systems, and supports touch gestures.
- › Video Outputs / Playback
-
- Will videos purchased from the iTunes Store work with MegaSeg?
-
Yes all newly purchased iTunes Store music videos will play in MegaSeg. However while MegaSeg has been able to play older DRM copy-protected audio files, older music videos purchased prior to 2009 will not play. Apple has since removed all DRM copy‐protection from iTunes Store purchased music in 2009. (Note the iTunes Store is still available within the Music.app by opening Settings > General tab > and enable the ‘Show iTunes Store’ option.)
- How do I get my DVD music videos into MegaSeg?
-
There’s a free app called Handbrake that performs both DVD extraction and transcoding into MPEG‐4 (mp4) format for playback in MegaSeg.
- What are the best video settings? How do I output videos without showing on the Mac’s screen?
-
First open the Mac’s System Settings from the Apple menu, click on Displays, and uncheck the Mirroring option. This will give you two discrete desktops, the main desktop with the menu bar on your Mac’s screen, and another secondary desktop that can be used for MegaSeg’s video playback. Note, you can also turn the Mirroring option on and off from the menu bar if you enable the ‘Show Displays in Menu Bar’ option.
Next, if you have macOS 10.9 or higher, you will need to hide the Menu Bar showing at the top of every screen (including the video output). You can do this in the System Settings under the Mission Control settings, hidden away oddly as an option called "Displays have separate Spaces", instead of being located in the Displays preferences as you might expect. (Apple may change this in future macOS updates.)
Back in MegaSeg, when you select the Video menu’s Full Screen menu option (“letterbox” mode recommended), MegaSeg will automatically detect if you have a 2nd display connected and show the video full screen on that display (or video output). If you have more than two video screens connected, you can select the screen by setting MegaSeg’s Video window to Normal Size, and drag the video window to the display, and then select the Full Screen video option.
The video resolution of the 2nd display (video projector, HD monitor, etc.) can be adjusted using the settings that appear directly on that display when the Mac’s System Settings > Displays settings are open. If you can’t see the 2nd monitor to make adjustments, there is a button on your main screen’s display settings called ‘Gather Windows’ that will move the 2nd display’s settings window to your main screen.
- How do I hide the menu bar from showing on my video output?
-
Newer versions of macOS (10.9 and up) added better support for multiple displays by allowing all Mission Control “Spaces” to be accessible from every display. However this also puts a menu bar across the top of all displays. In order to resolve this, open the System Settings from the Apple menu, then under the Mission Control settings, uncheck the "Displays have separate Spaces" option, and you’re good to go!
Also be sure to read our other video output setting recommendations.
- › Audio Outputs / Recording
-
- Can I use AirPlay with Apple’s Airport Express or AppleTV for remote speakers or preview?
-
Yes! In macOS 10.8 and higher, any “AirPlay” output devices will appear in the System Settings > Sound > Outputs tab. If you select the device there, it will connect and add it as an output option in MegaSeg’s Settings > Devices > output settings. You can use this for the main Playlist or Preview output option. For older Mac systems, or if you wish to support multiple AirPlay devices, you can use a program called AirFoil from Rogue Amoeba, to send MegaSeg’s audio to any AirPlay compatible devices.
- How do I hook my Mac into an amp or PA?
-
You can either use the built-in line output on your Mac, or various external audio interfaces to connect to any amp, powered speakers, or PA system. When using the built-in line out (i.e. the headphone jack) you’ll need to get an 1/8th inch stereo to RCA audio cable. If you experience a hum or buzz in the audio when hooked up, you may need to use a ground loop isolator which can eliminate the interference caused by pesky ground loops. You should only need this if you hear a hum or buzz when using a standard cable. Note that external audio interfaces, such as USB audio devices, also typically avoid ground loop issues.
For the best signal-to-noise ratio, you should maximize the volume of the output device you use with MegaSeg while connected to a mixer or sound system. To do this, select System Settings in the Apple menu, and click on Sound, then the Outputs tab. Each output device has its own master volume setting. In the list, select each device one by one, and maximize the volume slider (if available for that device) for the highest quality signal.
Some external audio interfaces may default to a lower volume, because they assume they are being used with headphones at first. Here’s steps how to check and fix this for the loudest ‘line-level’ signal to a mixer or PA:
- Connect the USB audio interface to your Mac.
- Click the Apple Menu > System Settings (or System Preferences on older Macs)
- Select ‘Sound’ on the left list (or if Preferences, in the grid of icons)
- Under ‘Output & Input’, make sure the ‘Output’ tab is selected
- Select the USB audio interface in the list.
- Below the list is a Volume slider — If it is not grayed out (disabled) then the device supports software or OS volume adjustment — You must now increase that volume slider all the way to the right.
- If it was already turned all the way up, move it to the middle and let go of the mouse so it sets, then click and drag move it all the way up again. There is (or was) an old macOS bug where it sometimes shows 100% volume, but was not actually set to 100% until adjusted once.
- If it was grayed out (disabled) that means the device doesn’t support OS-volume adjustments and thus always in a fixed ‘line-level’ mode.
Finally note, that this system settings volume slider only adjusts the currently selected audio device in the list. The same is true of the Menu bar’s volume adjustment, as well as the Mac’s volume adjustment keys. All of them are tied to the currently selected “system output” device.
Once you set the volume for a device, you can switch the system-selected output back to another device, such as ‘MacBook Speakers’, and you’ll see the volume adjustment changes back to the last volume set for that device, but the volume setting for other devices will stay as they were set.
- How do I use my headphones for cue?
-
You’ll need to use a second sound output, such as an inexpensive USB audio adaptor. MegaSeg has two ways of using the second output for cue and preview...
- Using one output as “Program” and the other output as “Cue”. Either the built‐in output or various USB audio interfaces can be used as the main “Program” output; use the other output for your headphones. This method works great for basic Previewing and Cueing, and is the default setting.
- Select MegaSeg’s ‘Discrete Output Mode’ in the Output Settings window (in Preferences) to use both outputs as “Program” channels via an external mixer. This is like having two CD Players or turntables. A track stays on one sound output throughout the duration of the track. This mode works great for beat mixing.
- How do I record audio from MegaSeg?
-
There are several options to record MegaSeg’s audio playback. One option is to use a utility such as BlackHole (free), or Loopback, all of which creates a “virtual audio device” that can route MegaSeg’s audio into any recording app, such as Apple’s QuickTime Player, GarageBand, or Logic. (See a detailed list of steps outlined below for BlackHole.)
You can also record the audio from MegaSeg (and optionally, all system audio) using utility apps that capture audio directly from MegaSeg and save it to an audio file. Some of these apps offer built-in effects and plugins like dynamic compression and EQ processing. Examples of these types of apps include:
Here are steps to record MegaSeg using BlackHole and QuickTime Player, as mentioned above:
- Download and install BlackHole from the following link: https://existential.audio/blackhole/
- Open MegaSeg’s settings and go to the Devices tab. Select BlackHole as the output device from the Playlist Output menu.
- In your Mac’s menu bar, click the volume icon and ensure that the default output device is set to your Mac’s speakers, not BlackHole. (You can also do this from System Settings > Sound icon, if you are on macOS 10.15 or older.)
- Inside your Applications folder, open QuickTime Player and go to the File menu, and select ‘New Audio Recording’.
- In the QuickTime record window, click the arrow next to the red record button and select BlackHole as the input device. Change the quality to ‘Maximum’ for a lossless recording, or ‘High’ for an AAC compressed file.
- Adjust the volume knob in the record window to monitor the audio being recorded from MegaSeg.
- Start playing audio in MegaSeg and you will see the meters move in the QuickTime record window, and you will also hear the audio through your speakers.
- When you are ready to start recording, click the red Record button in QuickTime Player. When you are done, click Stop, and a player window will appear. You can save the file using the File menu or you will be prompted to save when you close the window.
- › Library / Metadata / Technical
-
- How do I backup my Mac & MegaSeg?
-
 The WD 5TB Passport external drive is a perfect backup option with excellent speed and plenty of room for either incremental Time Machine backups and synced mirror copies.
As an Amazon Associate we earn a commission on qualifying purchases.
The WD 5TB Passport external drive is a perfect backup option with excellent speed and plenty of room for either incremental Time Machine backups and synced mirror copies.
As an Amazon Associate we earn a commission on qualifying purchases.
The best way to backup your Mac is with Apple’s Time Machine feature already included in your Mac. Simply connect an external hard drive and choose it as your backup drive in the Time Machine settings (located in the Apple menu > System Settings.) After Time Machine has finished the initial backup, it will copy any new or modified files automatically every hour (or each time you connect the drive). This will protect all your valuable documents and media, including the entire macOS system files, installed apps, and MegaSeg’s data files. It also allows you to restore specific files or folders from any backup snapshot.
While Time Machine is the recommended method, there are a few alternative solutions that work in a similar way, but with more options and features to backup only specific folders and/or sync them between volumes or systems. Carbon Copy Cloner, ChronoSync, Resilio Sync, and SuperDuper! are apps can be set to backup the entire system, just your home folder, or a set of specific folders, with the ability to only copy new or modified files. These options are useful if you’re tight on external drive space, or want to keep a bootable “mirror copy” of your main drive. Even if you opt to use an alternative backup app, we still recommend also using Time Machine to backup your full system drive, giving you snapshots of your entire system allowing you to rollback system updates, or restore files from specific snapshots. Two backups are always better than one!
If you have two or more Macs you want to keep in sync for a “hot backup”, you can use the ChronoSync and Resilio Sync apps described above to handle the syncing of files between them directly. You can connect any two Macs together using a Thunderbolt cable for fastest transfer speeds (the original USB charge cable works for this.) Now shut down the Mac you want to access, then turn it back on and immediately press and hold the ‘T’ key which will enable Target Disk Mode. This allows the Mac’s internal drive to be used as a virtual external Thunderbolt drive for the other Mac it’s connected to. You will then see the drive appear on the desktop as an external Thunderbolt drive. Then just use your sync app to update the entire volume, or specific music folders as described above.
Finally, if you want to geek out, there’s a Terminal command that can sync between drives (or remote servers) called ‘rsync’. This MacLife rsync tutorial gives a good overview of common usage.
- How do I transfer MegaSeg to a new Mac, with proper categories, playlists, logs, and metadata?
-
There are two main ways to do this: manually copying files, or using an automated tool like Apple’s Migration Assistant. We’ll start with a quick overview of each method, then get into details and tips.
Method 1 — Automated Migration
If you’re setting up a new Mac, the easiest and most complete option is to use Apple’s Migration Assistant. This transfers your entire home folder (Desktop, Documents, Downloads, Pictures, Email, Music, etc.), plus installed apps and system settings, onto the new Mac. It’s best to do this when turning on the new Mac for the first time, before creating any account.
Before starting, on your old Mac open MegaSeg and choose File > Library Tools > Scan for Missing Files. Note the number of missing files (if any), then quit MegaSeg. This acts as a pre-migration audit to ensure your library is fully updated before the transfer.
On the new Mac, use Migration Assistant and follow Apple’s steps. Once complete, open MegaSeg first and choose the ‘Scan for Missing Files’ again on the new Mac. The missing file count should match your original audit. After this second scan, it’s safe to open Music.app or iTunes. You’re done!
Method 2 — Manual Copy
Manually copy files by following these steps:
- On the original Mac, open MegaSeg and select the File menu > Library Tools > Scan for Missing Files command. This important step ensures all your tracks are properly linked and up-to-date prior to the transfer. (If running an older version of MegaSeg and a single missing file dialog appears, click ‘List All’.) If you have any missing files, simply note the number as a reference for step 8.
- Quit MegaSeg on the original Mac and copy the app file to your new Mac, or download a fresh copy via our License Recovery system.
- Important: On the new Mac, do not open MegaSeg, Music.app, or iTunes yet. If they are already open, quit them. They must not be running during the following steps. (Tip: You can tell if any apps are running by looking for a dot under or beside the icon in the Dock, or press Command-Tab to bring up the App Switcher that shows all the running apps.)
- From the original Mac, locate your Music folder by clicking the Go menu in the Finder and choose ‘Home’. The Music folder will be found inside your Home folder. Now copy the entire contents from inside the Music folder to the exact same folder location on the new Mac. (This will include sub-folders for MegaSeg, Music.app, iTunes, etc.)
- Note: If a MegaSeg, iTunes, or other folders are already in the Music folder on the new Mac, make sure to select Replace, and not Merge. (If you are worried about losing data on the new Mac, move the conflicting folders into a new sub-folder.)
- If you have used MegaSeg prior to 2010 on your original Mac, check to see if you have a ‘MegaSeg User Data’ folder inside your Documents folder (~/Documents/MegaSeg User Data/). If you do, copy it to the Documents folder on the new Mac as well.
- Copy any other media folders you’ve imported into MegaSeg to the exact same location on the new Mac. This may include things on your Desktop or other folders such as Downloads, Movies, etc. (Tip: To see exactly what folders outside of Music.app or iTunes you’ve imported, select MegaSeg’s File menu > Remove Folders command, which shows a tree-view of imported folders.)
- On the new Mac, do not launch Music.app or iTunes yet. Open MegaSeg first and select the File menu > Library Tools > Scan for Missing Files command. It should report “No Missing Files”, or give you the same number of missing files as noted from the old system in Step 1. You’re almost done...
- If your old Mac was running macOS 10.14 or earlier, you were using iTunes instead of Music.app, and you copied your iTunes folder over in step 4 above. Now you’ll need to have the new Music.app “adopt” your older iTunes Library. To do this, hold down the Option key while opening Music.app. In the “Choose Music Library” dialog, click “Choose Library...” and select the iTunes Library.itl file inside the iTunes folder here: ~/Music/iTunes/iTunes Library.itl (the .itl extension may be hidden). Music.app will then prompt you to save a converted copy of the library into your main ~/Music/ folder (usually named “Music” to match Music.app, e.g. ~/Music/Music/). After that, your original iTunes library should appear intact. Note the media files in Music.app will still be linked to your original iTunes Media folder without duplication. You’re now done!
👍 Now read the full article below for additional info and tips!
The Full Article — Before You Start
On your older system, run MegaSeg’s Scan for Missing Files command (File menu > Library Tools > Scan For Missing Files). (If running an older version of MegaSeg and a single missing file dialog appears, click ‘List All’.) This scan ensures MegaSeg is up to date, prior to migrating. Don’t worry about any missing files at this time. But if you wish to clear missing files out of your MegaSeg library, you can remove them using the ‘Remove All’ button. Next, make sure MegaSeg and Music.app/iTunes are not running on both systems.
Determining The Transfer Mechanism
Option 1: Direct USB or Thunderbolt Cable
If both Macs have USB or Thunderbolt jacks, you can use a USB or Thunderbolt cable to connect them together. Then you can access the files from the older Mac’s drive directly from the newer Mac using either “Target Disk Mode” or File Sharing.
Target Disk Mode steps (only if older Mac is Intel-based): If either Mac has macOS 11 or higher, you must use a Thunderbolt cable, otherwise any USB cable will work. Once the cable is connected, restart the old Intel-based Mac and hold down the ‘T’ key until you see a special logo appear. This means the old Mac is now acting as an external drive and should appear on your new Mac’s desktop. (If not, you may need to open a new Finder window and browse to it.)
File Sharing steps (if old Mac is Apple Silicon based, e.g. M1/M2/M3): On the older Mac with Apple Silicon, choose Apple menu > Shut Down. Next press and hold the power button until “Loading startup options” appears, and click Options, then click Continue. Select your startup disk, then click Next. When in Recovery mode, choose Utilities > Share Disk. Select your startup disk, then click Start Sharing. On your new Mac, switch to the Finder and click the ‘Go’ menu and choose ‘Network’. Double-click the Mac that has the shared disk or volume, click Connect As, select Guest in the Connect As window, then click Connect.
Option 2: Direct Ethernet Cable or WiFi
For Macs with an Ethernet port (or Ethernet dongle), connect an Ethernet cable between both Macs and turn on File Sharing in the System Settings on either Mac. You can then login and copy files over the network. A slower alternative to using an Ethernet cable is to connect via WiFi.
The WD 5TB Passport external drive is a perfect backup option with excellent speed and plenty of room for either incremental Time Machine backups and synced mirror copies.
As an Amazon Associate we earn a commission on qualifying purchases.
Option 3: External Hard Drive
Use an external drive to transfer files. This method is typically slowest unless you already have a fresh Time Machine backup, as it requires copying files twice (both to and from the transfer drive). If you use Apple’s Time Machine to backup your Mac, simply make sure you’ve backed up today and then use it to “restore” into your new Mac using the Migration Assistant (in your Applications > Utilities folder) or Recovery Mode by holding down the Command + R keys immediately after restarting the Mac (see “Automatic Method” below.) Otherwise, you can manually copy files by browsing into the “Latest” folder (most recent date) within the “Backups” folder (aka “Backups.backupdb” if you have extensions visible) on your Time Machine drive (see “Manual Method” below.)
The Automatic Method
To assist in the actual copying of files, you can use Apple’s Migration Assistant application to handle everything automatically. The Migration Assistant is located in the Applications folder inside the Utilities folder, but you are also asked if you want to use this when first booting a new Mac. This is highly recommended when you get a new Mac to ensure all your stuff is moved correctly — It’s like performing a complete brain transplant.
The Migration Assistant will walk you through the step to either restore from a Time Machine Backup, or connecting two Macs together to perform a direct transfer (via the above mentioned Target Disk Mode, Ethernet, or WiFi), and take care of copying over your home folder, including the Music folder where MegaSeg stores its database, and Music.app or iTunes stores its media files, as well as your applications, documents, emails, settings, and other important data.
☝️Note, because the Migration Assistant moves an entire home folder account (and does not support merging into an existing account) it’s best to use this when a Mac is freshly unboxed and first turned on (i.e. when it firsts asks you if you have data to transfer from an old Mac), and not after you've set up an account and started using it for any substantial amount of time. Otherwise you will end up with two user accounts after migration. You could delete the second unwanted account and start using the freshly migrated one, but then you must decide if you need to first manually merge/copy any of your important documents from one account into the other before you remove the redundant account without suffering data loss, or if it’s better to use the manual method below and copy only the things you need from the old Mac into your existing account on the new Mac.
The Manual Method
Option 1: Copy all media and data folders.
First locate the old Mac’s main Music folder by clicking the Go menu in the Finder and choose ‘Home’. The Music folder will be found inside your Home folder. Generally, if you copy the entire contents of your Music folder to the Music folder on the new Mac, you’ll be good to go. More specifically, MegaSeg’s library, playlists, logs, etc. are stored inside the “MegaSeg” folder inside your Music folder (located at ~/Music/MegaSeg/). Move this folder to your new Mac at the same location (inside the ~/Music/ folder). Note, if a MegaSeg folder is already in the new location, be sure to select the Replace option. Next, for most users, the actual media files MegaSeg plays are inside the “iTunes” (~/Music/iTunes/) or “Music” sub-folder (~/Music/Music/) within the main Music folder, and simply copy those to the same location on your new Mac’s main Music folder. (Note, if you’ve been using MegaSeg prior to version 5.5.5 (circa 2010) check to see if you have an older version data folder inside your “Documents” folder (~/Documents/MegaSeg User Data/). If so, copy it to the Documents folder on the new Mac as well.)
Next you should check to see if you may have imported files from other folders or external drives using MegaSeg’s ‘Folders View’. Display this view using the library’s sort menu and select ‘Folders’, or choose the File menu > Remove Folders command. Once the Folders View is displayed, it will show a list of drives you’ve imported from, and you can click the triangles to expand each drive and navigate down the folders to locate anything else you may need to copy over.
Once everything is copied, skip to the Finishing Up section below.
Option 2: Copy playlists only.
If you only want to move a handful of specific playlists over, you can pull the Playlist folder out of MegaSeg’s data folder (or individual playlist files stored inside) and put them in the same Playlist folder location on the new system.
Finishing Up
Before running Music.app, iTunes, or anything else, first start up MegaSeg on the new system, and it should display the same tracks, and you‘ll be able to play everything as long as you put the media files in the same location as on the old system.
Next, it is very important to use MegaSeg’s Scan for Missing Files command located in the File menu > Library Tools sub-menu. This will ensure MegaSeg has updated paths and File tracking codes for all media files, so if any files move around on the drive later, MegaSeg will still be able to find everything on the new drive just fine. (If running an older version of MegaSeg and a single missing file dialog appears, click ‘List All’.) The report should match any missing files you already had on the old system (from the “Before You Start” step above.
If you run into substantial additional missing files on the new system, this means that something didn’t get copied over properly using the manual method step above, and you may need to re-check for additional folders you need to copy. Otherwise if you are sure everything made the transfer, and the missing file report is still longer than on the original system, you may need to use the Remove Folders command in MegaSeg’s File menu to clear everything out and reimport your music fresh. (This normally should not cause your custom categories or segue times to reset, as all of MegaSeg’s custom metadata is stored in the actual files as a backup, specifically for a situation where you need to reimport everything.)
Finally, if your old Mac was running macOS 10.14 or earlier, you were using iTunes instead of Music.app, and you copied your iTunes folder over in step 4 above. Now you’ll need to have the new Music.app “adopt” your older iTunes Library. To do this, hold down the Option key while opening Music.app. In the “Choose Music Library” dialog, click “Choose Library...” and select the iTunes Library.itl file inside the iTunes folder here: ~/Music/iTunes/iTunes Library.itl (the .itl extension may be hidden). Music.app will then prompt you to save a converted copy of the library into your main ~/Music/ folder (usually named “Music” to match Music.app, e.g. ~/Music/Music/). After that, your original iTunes library should appear intact. Note the media files in Music.app will still be linked to your original iTunes Media folder without duplication. You’re now done!
- Can I consolidate my music from multiple drives, or move from an old drive to a new one?
-
Yes this is possible by putting them in the exact same place on the new drive (maintaining the original path location). MegaSeg will automatically find the files on the new drive without any other prompt or action required, as long as the path has not changed besides the drive name.
For example, if two songs are on two drives at the following paths:
Drive One/Fruit/Sweet/Apples/Pink Lady.mp3Drive Two/Fruit/Tart/Oranges/Blood Orange.mp3You can move them both to a new drive here:
New Drive/Fruit/Sweet/Apples/Pink Lady.mp3New Drive/Fruit/Tart/Oranges/Blood Orange.mp3...And MegaSeg will find everything automatically.
You can even change the path slightly by trimming upper folder levels like so:
New Drive/Apples/Pink Lady.mp3New Drive/Oranges/Blood Orange.mp3...Note the Fruit, Sweet, and Tart folders have been removed from the path, yet MegaSeg can still find everything just fine.
However, you can’t change the path by adding or renaming folders, or removing mid-level folders:
New Drive/New Folder/Fruit/Sweet/Apples/Pink Lady.mp3New Drive/Tart/Renamed Folder/Blood Orange.mp3New Drive/Fruit/Apples/Pink Lady.mp3After you complete moving and/or consolidating files into correct paths on a new drive, use the ‘Scan For Missing Files’ command in MegaSeg’s File > Library Tools sub-menu. This will update the paths in the database and confirm everything was found successfully. (While MegaSeg does locate and update file paths on-the-fly, it is highly recommended you perform the full scan after making major changes.)
Once the scan is finished and reports no problems, and if the drive is Mac formatted, you can rename or reorganize folders as desired on that particular drive. This is because MegaSeg will track files and folders on a specific drive using a special File ID that is unique to that drive. Note this file tracking feature only works with Mac formatted drives. You can check your external drive’s format by selecting the drive in the Finder and choose the File menu > Get Info command to ensure it is either “APFS” or “Mac OS Extended (Journaled)” format.
If the drive is not Mac formatted, it’s still possible to reorganize or rename folders if you manually edit MegaSeg’s file path info by exporting the library data (using the File menu > Library Tools > Save Library as Text command), and perform a global find-and-replace for the specific path changes using either a text editor or spreadsheet app (such as Apple’s TextEdit or Numbers). Then import the modified library back into MegaSeg using the File menu > Library Tools > Open Library as Text command.
- Can I change the name of audio files without problems?
-
Yes, on drives formatted for APFS or HFS+, MegaSeg keeps track of the files using a special tracking FileID. This means you can move or rename a file on the same drive and MegaSeg will be able to relocate it automatically. MegaSeg also keeps track of the audio files in the database by path and filename. It will check this first, so you can swap out a file easily. If for some reason it can’t locate a file, then MegaSeg will give a missing file error, and allow you to manually find or remove the file.
- Can I use an external drive or network server for more music?
-
Yes, with MegaSeg you can import files directly from any external or network drive.
Note when considering an external drive, if going with a non-SSD (i.e. spinning platter tyge), we normally recommend full‐size models (3.5" enclosures) with dedicated power and good ventilation, rather than ultra-thin bus‐powered models; as some compact (non-SSD) drives may not be designed for constant long-term or heavy use, and could overheat easily. Make sure to stress test compact drives for the length of time you’ll typically use it.
For a multi-user radio station setup using MegaSeg Pro (which can network sync the library and playlists between systems, such as the on-air studio, production room, and program director’s office), we generally recommend the on-air system be the primary server for the other MegaSeg systems. This allows the most critical MegaSeg system to have direct access to the media files. All other systems (production room, program director, etc) can then access MegaSeg’s library and media files remotely via the “on-air server”.
- Can MegaSeg play MP3, MP4, AAC, FLAC, ALAC, Ogg, MPEG-2, and other file formats?
-
Yes, MegaSeg supports all popular formats including MP2, MP3, MP4 (MPEG-4), M4A, M4P, MOV, AAC, Apple Lossless, AIFF, WAV, FLAC (on macOS 10.13 or higher) and anything QuickTime Player can play.
- Can MegaSeg play tracks from the iTunes Store or Apple Music?
-
Yes, you can play both purchased iTunes Store tracks without limitations, as well as Apple Music Subscription tracks with some limitations.
The Apple Music monthly subscription is essentially a music rental service, which uses DRM to facilitate the rental aspect of the service. That is, if you cancel or stop paying for Apple Music, all the tracks you’ve downloaded through the service will be revoked and stop working (even in Music.app and your other devices.) Apple Music does not work like other professional-based subscription services (e.g. PromoOnly) where the tracks are provided without DRM, and if you cancel, you get to keep the music you received during the subscription period.
In short:
iTunes Store: Pay once and own the tracks forever (DRM-free).
Apple Music: Rental only; Restricted access; Keep if you pay forever.Note the iTunes Store is still available within Apple’s Music.app by opening Settings > General tab > and enable the ‘Show iTunes Store’ option.
That said, MegaSeg offers limited playback support of DRM Protected files you have downloaded from the Apple Music Subscription service. This is useful for most people to utilize as a supplement to their core purchased music library from the iTunes Store or other sources, as you can interleave DRM tracks with standard purchased tracks. Again note that tracks must be downloaded and not in the cloud. You can control-click (aka right-click) on a playlist in iTunes/Music.app to download all the tracks within that playlist, making them available to MegaSeg.
- What is the best method to import new tracks from Music.app or iTunes?
-
MegaSeg offers multiple methods to import tracks from both the new Music.app and iTunes, including scanning the Music Library database, searching its media folder directly, opening a playlist from Music.app/iTunes, or dragging tracks directly into MegaSeg’s window or dock icon.
If you are using an older Mac with iTunes (not the new Music.app), we recommend enabling the ‘Share Library XML’ option in the iTunes Preferences:
➊ Open iTunes Preferences
➋ Click the Advanced tab
➌ Check the ‘Share iTunes Library XML...’ checkbox
➍ Click OK to close the window
❺ Restart MegaSeg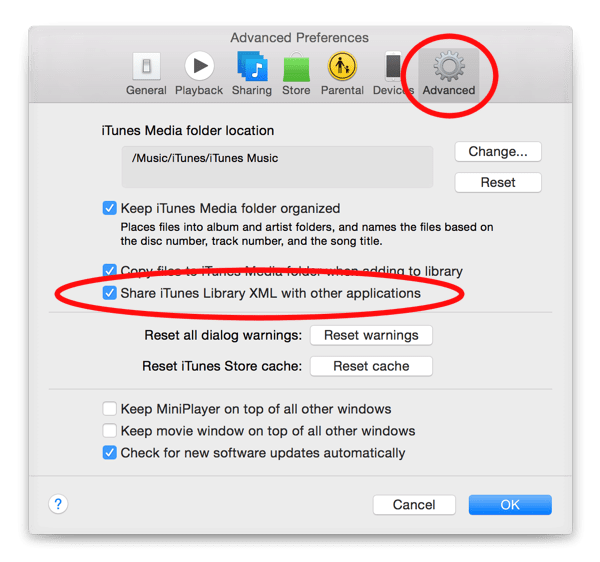
-
Make sure you are viewing all songs you want to update in the Library view (selecting ‘All Categories’ will display all songs imported), then go to File > Library Tools > Import Metadata Tags. Then select the fields you wish to update and click Process. This will take several minutes depending on the size of your library. (Note the ‘time’ field takes the longest to process, as is unchecked by default.)
- Can I have my own music categories or genres?
-
Yes. MegaSeg allows you to customize your categories. You can even put a song into multiple categories. This is available by clicking the Set button next to the Category field in the Edit Media dialog (or File > Edit Media menu).
- How do I use a microphone with MegaSeg?
-
MegaSeg Pro includes a Mic On/Off button which automatically attenuates the master music volume, and enables software play‐thru from any audio input to the audio output device you select in MegaSeg’s preferences. For example, you could use the built‐in microphone and have MegaSeg send the audio to an external USB audio output, or the built‐in speakers.
- Can MegaSeg beat mix between songs?
-
Yes! MegaSeg has many beat mixing features, including a wave viewer for visual mixing and syncing beats, support for multiple sound outputs for preview and cue, multi-touch trackpad control, as well as full MIDI DJ controller support. In MegaSeg DJ the Mixer is always visible, where in MegaSeg Pro you can optionally hide the Mixer view — Click the Mixer button to the right of the Playlist to toggle the full mixing controls. Read more about output options, as well as examples of popular DJ controllers.
- What is the maximum number of songs MegaSeg can handle?
-
There’s no set limit to the library size. MegaSeg will try to handle as many files you throw at it, although there are practical limits depending on your available RAM and drive space to store media. We’ve tested and optimized MegaSeg for libraries with over 1 million records.
- Are the playback setting’s ‘fade-out time’ saved with the song?
-
The Fade-Out Time is global and defaults to 3 seconds. Each song does have its own custom segue time (or end time), and allows you to override the fade‐out with the ‘Fade‐out Override’ checkbox. You can also use the Voice-Over checkbox (which automatically enables Fade-Out Override) to make a voice track play over the intro of the next song in the playlist (and backtime into the vocal if required).
- What is the function of the ‘Intro Time’ field in the Edit window?
-
Intro Time is used to display a count down timer to the start of the song’s vocal. It’s useful if you talk over the intro of a song (radio style) and keep track of how much time is left before the singing starts.
- Is there a way to set a “cold ending” segue time on certain tracks?
-
Yes. Set a custom ‘End Time’ (aka segue time) at the exact time of the cold ending. MegaSeg will start the next song at this exact time. The fade-out always begins at the segue time, so it won’t affect the cold ending of the song. (Setting a custom ‘End Time’ also disables ‘Auto Trim’ mode for that track.)
- Can MegaSeg print the Library, Playlists, Logs, or Play History graphs?
-
Yes, MegaSeg has a Print command in the File menu that allows you to print either the currently selected Library, Playlist, Logs, or Play History windows. Just click to select the list and then choose Print from the File menu (or Command-P) and check the fields you want included in the list.
Alternatively, all saved Playlists are text files stored in the Playlists folder. You can print them using a text editor or spreadsheet like Excel or Apple’s Numbers and reformat as necessary. The Library can also be exported as a text file by using the ‘Export Library as Text’ menu command. The tabbed text file can open in a spreadsheet program, such as Numbers or Excel.
- How is the database formatted?
-
The database is conveniently exported as a text file located in the MegaSeg data folder inside your Music folder. This makes it easy to “power edit” using a standard text editor if necessary. You can also export and import the Library as a tab delimited text file to edit using a spreadsheet such as Numbers or Excel using the File > Library Tools menu.
- Does MegaSeg install any files into my system?
-
No, MegaSeg is completely self-contained and utilizes built-in macOS libraries and APIs such as Core Audio, AVFoundation, and QuickTime. In fact, the only files MegaSeg saves is for its Library, Playlists, Logs, etc. (within ~/Music/MegaSeg/ by default.)
- › Troubleshooting
-
-
There are a few possible solutions to this issue. First, try the Deauthorize command, and then the Reauthorize command under the Account > Authorizations menu inside Music.app or iTunes. Once reauthorized, reboot your Mac.
If reauthorizing doesn’t help, and you have OS X 10.10 or older, try upgrading to OS X El Capitan 10.11 or newer, which is known to resolve authorization issues on older systems.
Another unusual authorization issue to watch out for is having two or more accounts for purchased iTunes Store music. For example if you used a different iTunes account years ago, you’ll need to authorize that account as well, even though you’re no longer actively using it. (You can authorize your Mac for multiple iTunes accounts.) To check which account was used to purchase a track, select the song in iTunes and choose the File menu’s ‘Get Info’ command, and the account name will appear under the Summary tab. (Note while your Mac can be authorized for multiple accounts, each account can only authorize 5 Macs simultaneously.)

Finally, as all individual songs and albums purchased from the iTunes Store today are no longer DRM copy‐protected (as of 2009), it’s possible to upgrade your older (pre-2009) purchased music to the newer DRM-free format for a small fee using Apple’s iTunes Match service. This will scan your entire library and replace everything it can match with DRM-free copies (aka “iTunes Plus” format that also doubles the bitrate), including tracks you may have ripped from CD or purchased from other sources (up to 100,000 tracks).
See Apple’s support articles for more details about iTunes Match and how to download iTunes Plus versions of your older purchases.
- Tracks in my Library are linked to the wrong files. How do I clear my Library and reimport?
-
MegaSeg keeps track of files using macOS Alias technology. This means that even if a file is renamed or moved on the drive, MegaSeg will still be able to find and play it. However if you swap drives, or transfer your files to an external drive, it’s a rare possibility for it to get confused and cross‐link to random files, if they’re moved or renamed on the new drive before MegaSeg gets a chance to re-index them at their new location. A simple solution is reimporting the files fresh. Note all your database info will remain intact, since MegaSeg tags each file with its custom metadata.
Here’s how to clear out your library and reimport:
- First it’s a good idea to backup your current database, just in case you want to revert back to it. Open MegaSeg’s Preferences, and click on the General tab. There note the path to the MegaSeg data folder. Typically this is ~/Music/MegaSeg/
- Find that folder on your drive with the Finder. Select the folder, and select Duplicate from the File menu. This create a backup of your current library and playlists.
- Return to MegaSeg, and select Remove Folders from the File menu. This shows a window with the names of all the volumes that have files and folders imported into MegaSeg. Select the first volume listed, and press the Delete key on your keyboard. Continue to remove all volumes listed until this list is empty. Note, this only tells MegaSeg to remove the files from MegaSeg library... It does not delete or trash the files and folders themselves.
- You should now have an empty library. Select the Import button, and then the Options dialog on the lower right corner of the dialog. Make sure the Use MegaSeg Tags option is checked, and click OK.
- Click the Import button, then the Import Folder button and navigate to your main music folder, and select that folder to import. MegaSeg should bring everything back into the library with all the proper info. Repeat this last step for any other media folders on other drives you may have.
You should now have a fresh re‐linked library. This will solve the problem of cross‐linked files or “Play Error -1”.
- What is Auto Trim and why do some tracks end early?
-
The Auto Trim Range setting is the range of time at the end of a track where MegaSeg starts to listen for an appropriate automatic segue point, and not a fixed or hard trim amount. The Auto Trim feature is useful for ‘catching’ songs that have not been set to a specific custom end time, preventing loose segues or dead air. The default trim range is 7 seconds, which can be adjusted in the Playback tab of the settings window.
Further note that Auto Trim is not in effect for tracks with a specific user-set end time, nor for tracks under 95 seconds or over 21 minutes (such as commercials, jingles, and podcasts) to prevent cutting off these non-music items. If needed, you can manually trim these tracks by setting a custom end time in the Edit dialog’s End Time setting.
- Why do mono files have no sound or play out of the wrong channel?
-
This is most likely an issue with how your audio output device is configured for surround sound channels. By default if you are using a sound output device that supports multiple channels, it may send mono tracks to the 3rd output connection it assumes is used for a 5.1 surround sound “center speaker”. This is very easy to change using Apple’s Audio MIDI Setup app, which allows you to define the speaker arrangement for any sound output device...
- Open Audio MIDI Setup (found in your Applications > Utilities folder)
- Click on the Audio Devices tab.
- Select the output device you use for playback
- Click the Configure Speakers button
- Click on the Multichannel tab
- In the pop‐up menu to the right, select ‘Quadraphonic’ or other geometric configuration (depending on the number of stereo pairs on the device).
- How do I solve a restart message that appears in several languages?
-
This restart message is known as a “Kernel Panic”, and generally means something went wrong deep within the OS or hardware. One common cause is a bad or failing RAM chip. If you installed additional RAM recently, it could be that it does not conform to Apple’s specs, or just a flaky module. Some brands may be temperamental in your model of Mac. If you have two RAM slots filled, try removing one and running for a while to see if the problem goes away. If not, swap the RAM chips and try using only the other one for a while to help narrow the problem down.
Another likely cause is the Mac system file becoming corrupt on disk. This can be solved by reinstalling the OS from a Recovery Boot, the original discs, or sometimes just doing a system update (using Software Update in your Apple menu).
Finally a there could be a driver conflict for some 3rd party hardware you have added. If you’ve installed a piece of hardware that requires a driver of some sort, try uninstalling or downloading a newer version.
You can also try some of the tips in our troubleshooting checklist, for example running Disk Utility to repair the disk, resetting the PRAM, and booting in Safe Mode which also repairs permissions.
- Do you have a checklist to troubleshoot issues or improve system performance?
-
Yes, below is our checklist. There are various things that could affect performance or cause system issues, for example disk corruption, software and hardware conflicts, swap file fragmentation, or “run‐a‐way” processes. The good news is Macs rarely suffer from these issues. However if a problem does arise, here’s a list of things to troubleshoot:
Check For Updates
Sometimes a fresh system update and the optimizations that are performed after installing can clear up an issue. In macOS 10.14 and newer, system updates appear under the Apple menu > System Settings. In macOS 10.13 and older, all system updates appear in the Mac App Store’s Updates tab. Then make sure you have the latest version of MegaSeg installed by selecting the ‘Check For Updates’ command in MegaSeg’s Help menu.
If you are running a Mac with system version 10.10 or older, consider upgrading to at least 10.12 or newer. Apple has a support article that lists Mac model compatibility, with download links. Here’s a list of macOS upgrade options:
- El Capitan 10.11 (6 GB direct download)
- Sierra 10.12 (5 GB direct download)
- High Sierra 10.13
- Mojave 10.14
- Catalina 10.15
- Big Sur 11.x
- Monterey 12.x
- Ventura 13.x
- Sonoma 14.x
- Sequoia 15.x
Not sure which macOS version your Mac supports? First check what Mac model and year you have by clicking the Apple menu and choose "About This Mac". If it was made in 2009 or later, click your model type below, then scroll to find the year, and supported macOS version:
Startup in Safe Mode
There’s a special startup mode called “Safe Mode” (aka Safe Boot) which performs several housekeeping tasks such as repairing permissions and disabling system extensions for diagnosis purposes. This may help resolve or pinpoint a possible conflict or low-level system issue.
To perform a Safe Boot, follow the next steps, which differ if you have a newer Apple Silicon (M-series) Mac, or an older Intel-based Mac:
For Intel-based Mac’s, first shut down the Mac, then turn it back on and immediately press and hold the Shift key until you see the login window. (If your disk is encrypted, you’ll be asked to log in twice.) Once fully logged in, you will see “Safe Boot” appear in red text on the upper right of your screen when successfully enabled.
For Apple Silicon (M-series) Mac’s, first shut down the Mac, then press and keep holding down the power button until you see “Loading startup options” appear. Select your startup disk, then press and hold the Shift key while clicking ‘Continue in Safe Mode.’ Log in to your Mac. (You might be asked to log in a second time.) Once fully logged in, you will see “Safe Boot” appear in red text on the upper right of your screen when successfully enabled.
It is normal for it to take longer to boot in Safe Mode as it performs various “clean up and repair” tasks. You may also notice screen flickering and slower graphics as the video drivers are disabled in this mode for testing purposes. Once you get to your desktop screen, and completed any optional experiments, you can restart the Mac again normally, which will restore all system functions (e.g. hardware accelerated graphics.) For more info, see Apple’s Safe Mode support article.
Verify and Repair Disks
Run Apple’s Disk Utility app found in the Utilities folder inside your Application folder. This program can verify and repair your drive’s directory and data. If any of your drives need to be repaired due to disk corruption, it could be causing various system errors or issues. If Disk Utility reports you need to repair the startup disk, you’ll need to boot into “Recovery Mode” by holding down the ‘Command’ and ‘R’ keys immediately after booting or restarting the Mac, then run Disk Utility again from the recovery options. If Disk Utility reports it can not repair a disk, the disk corruption is beyond what it can handle, and if its an older drive formatted using Mac OS Extended (HFS+), we recommend using a stronger repair utility called DiskWarrior. (They’re working on a version that can repair the newer APFS format as well.)
Note in macOS 10.11 and higher, the “Repair Disk Permissions” function has been removed and now runs automatically when you perform a Safe Boot as explained under the “Startup in Safe Mode” tip above.
Check Internal Drive Space
If your internal boot drive is running low on space, it can cause system performance issues. It is generally best to have at least 2 GBs free on your drive. To check, select the Apple menu’s About This Mac command and click the Storage tab (or select your boot volume in the Finder and choose Get Info from the File menu.)
Scan for Malware and Viruses
macOS is secure by design and includes built-in protections like Gatekeeper and XProtect to guard against malware. However, if you notice unusual behavior (e.g. unexpected pop-ups, sluggish performance, unknown apps) or suspect you downloaded something unsafe, scanning for malware with a 3rd party app might be a good idea—especially on older macOS versions.
To scan your Mac, only use trusted well-known apps, such as:
- Malwarebytes — Free mode available. No need to pay for automated scans—just run a manual scan occasionally, or if you encounter issues.
- ClamXav — Free 30-day trial.
Check For Rogue Processes
Open the Activity Monitor application found in your Utilities folder, inside the Applications folder. Once open, make sure the pop‐up menu above shows “All Processes” (the default is set to “My Processes”). You can now see every process running on the system, including many hidden ones used by the Mac OS and the core UNIX OS. Click the ‘% CPU’ column header until the list is sorted from highest to lowest processor usage. Note if you see any apps that are taking up too much processor time for too long. If you see a process that is using 80–100% of the processor, it could be a run‐a‐way process. An example of this would be a printer driver that is not compatibility with the OS version or has a bug. There was a case of this happening a few years ago to a certain brand of printer. Try “googling” the name of the process to find out more about what it is and if anyone else has reported the same problem. (Be sure to include “Mac” in the search.)
Cold Boot The System
When you fully power-down your Mac via the ‘Shut Down’ menu command (not just the Restart option), it will allow the RAM and swap files to clear and reset. Sometimes this fresh start is all it takes after a system has been running for weeks or months on end, and only going to sleep between each use.
Disable Unnecessary Sharing Services
In System Settings click the Sharing icon. Under the Services tab, try turning off any services you do not absolutely need to be active. Sometimes these services will use extra processing power and can cause system delays depending on network status. Printer Sharing and Internet Sharing can be culprits, for example.
Experiment with WiFi and Bluetooth Turned Off
Try turning the Mac’s WiFi (AirPort) off in the System Settings under Network to help troubleshoot if the problem is network related. (If the problem goes away, see other network items below.) If you don’t require Bluetooth, you can also disable this in the System Settings’s Bluetooth icon. (You may want to at least disable the ‘Discoverable’ option even if you use a Bluetooth keyboard or mouse that’s already paired.)
Run Apple Diagnostics
The Apple Diagnostics startup mode will check your hardware for specific issues such as a memory test, power adaptor, WiFi, drive, and other subsystems. See Apple’s full instructions on how to get started with Apple Diagnostics. Note if your Mac is from June 2013 or older, you need to use the Apple Hardware Test steps instead.
Reset the NVRAM or PRAM (Intel only)
This applies to Intel-based Macs only: Sometimes the Mac’s Parameter RAM (aka PRAM or NVRAM) becomes corrupt and causes sluggish behavior. To reset the PRAM, restart your Mac and immediately press and hold down the Option, Command, P and R keys. You will see the Apple logo appear and then disappear as it restarts a second time (or hear two startup chimes on older Macs.) You can release the keys after you see the Apple logo appear a second time (or hear a 2nd chime.) Note that once the PRAM is reset, some basic settings such as display brightness and speaker volume will reset to their default settings (i.e. full brightness and volume.) See Apple’s related support article for more details.
Reset the SMC (Intel only)
This applies to Intel-based Macs only: The Mac’s System Management Controller (SMC) is responsible for many low-level functions (such as fan speed control), and if you are experiencing unusual performance, it is recommend to try resetting the SMC. To do this, it requires different steps for various Mac models. Please refer to Apple’s SMC support article for more information.
Run Periodic Tasks Via Terminal
There are special maintenance tasks which macOS runs overnight to improve performance. If your Mac is not awake at that time, the maintenance tasks may not run. However you can force these tasks to run manually via the Terminal utility (found in your Applications folder inside the Utilities sub‐folder).
When you run it and get a command prompt, enter the command:
sudo periodic daily weekly monthlyPress Return and it will then ask for your administration password. (Note there is no visual feedback while you type the password.) Once you enter your password and press Return, the cursor will drop to the next line and it will take several minutes for it to finish (possibly up to a half‐hour). There is no progress bar or other feedback displayed while it’s processing, so you’ll just have to wait for the command prompt to appear again to know it’s finished.
Remove Login Items
In the System Settings, click General > Login Items. Check to see what apps (some may be invisible processes) you have checked to automatically launch when you startup. Some 3rd party software may install “Agent”, “Helper”, or “Daemon” software that runs in the background. One of these may be incompatible with your current OS version, or cause slowdown issues if your network connection degrades. You can test by selecting them and pressing the minus button (or Delete key) and restarting. Note the checkbox does not disable them, you must remove it from the list — The checkbox simply sets the app to be hidden.
Repair the ACL (access control list)
Similar to repairing disk permissions is resetting the ACL, which is another type of file permission system in macOS. Sometimes messing with the Ownership & Permissions settings of certain home folders can cause conflicts, and you may need to repair the ACLs using the Mac’s “Recovery” feature. Just reboot and hold down Command-R to get into Recovery Mode, and then click the Utilities menu up top, and choose Terminal.
In Terminal on macOS 10.12 and higher, type “repairhomepermissions” and press return. A window will appear with options to select the volume and user you wish to repair. Once done, click the Apple menu and restart the Mac normally.
In Terminal on macOS 10.11 and older, type “resetpassword” and press Return. Instead of resetting your password, click the icon for your Mac’s drive at the top, and then in the popup menu below it, select your home folder account. Click the Reset button next to the “Reset Home Directory Permissions and ACLs” section below. Once done, click the Apple menu and restart the Mac normally.
Check For Excessive Console Errors
The Mac logs errors that happen in a “system.log” file you can easily inspect with the Console utility. Startup the Console inside the Applications/Utilites/ folder and it will show the most recent activity. While it often looks chaotic and cryptic, most of what is listed is not a problem. What you should look for is error messages that repeat over and over (for example every 10 seconds), or clues that appear during the problem in question. You can then search online for info about what is displayed.
Keep Things Cool
If you notice problems start after a few hours of constant use, it may be an over-heating issue with your Mac’s processor or an external drive. If using a laptop, try propping it up so there’s airflow underneath and use a small fan to assist in cooling. You might also try a laptop cooling pad.
If you use an external drive, some models may overheat with continuous use, which may cause erratic behavior. Make sure your drive has adequate ventilation. For example, some drives are designed to sit upright like a book vs flat. Take care to ensure heat vents are positioned as intended for optimal use.
Switch USB Ports and Cables
When using external USB audio devices, you may find some USB ports perform better than others depending on your Mac model. For example, on some older MacBooks the right side USB port was slower than the left. Switching ports or the cable can also help determine if a port or cable has a faulty or intermittent connection.
Uninstall Conflicting Backup Software
The Mac includes a great backup system called ‘Time Machine’ that works with any external drive you buy. However many drive manufacturers include their own backup software (e.g. “Backup Anywhere” from Western Digital.) We recommend removing these 3rd party backup apps and simply use Time Machine which is best designed to work with the Mac.
Power-cycle External Drives
If you have an external drive connected, disconnect and power‐cycle them to make sure they get a fresh start. Then reboot the Mac and plug them back in.
Format External Drives For Mac
Although the Mac is capable of using an external drive formatted for Windows FAT-32 or NTFS, it is much better to use the Mac’s native formats, “APFS” or “Mac OS Extended (Journaled)”. You can check the format by selecting the drive (either on the desktop or via the Finder’s Go menu > Computer command), and press Command–I or select Get Info from the File menu. The info window will display the disk’s format. If it is not using a native Mac format, you might consider backing it up and reformat the disk using Disk Utility (in the Utilities folder), and then restore the files from the backup.
Eject Network Volumes
If you use a network volume, server, or “shared drive” try un-mounting the volume to see if it was contributing to system delays.
Trim and Optimize Your Fonts
Check your installed fonts to see if you have too many fonts enabled at once. This may cause your system to slow down. Apple’s Font Book application can be used to manage your fonts.
Trash Preferences
While not likely a cause of issues, you may want to try trashing MegaSeg’s Preferences file. This will reset most of MegaSeg’s settings to their default values, but not delete your library, playlists, logs, or events (however if you use a custom data folder location, you will need to reselect it).
Below is a list of paths to MegaSeg Preference files (depending on the version) which you can copy and paste into the Finder’s Go menu > ‘Go to Folder’ command:
~/Library/Preferences/com.fidelitymedia.MegaSeg.plist~/Library/Preferences/com.fidelitymedia.MegaSegDJ.plist~ = your home folder (i.e. Macintosh HD/Users/...your username.../)
Note you must quit MegaSeg before trashing the preference file and reboot your Mac before relaunching MegaSeg in order to fully clear the preferences. Also if navigating to the preference file manually (rather than using the Go to Folder command), your Library folder will likely be hidden by default, but you can get into it by holding down the Option key while selecting the ‘Go’ menu in the Finder.
-
If your question was not answered, please contact us.